TN 014_ Manual Configuration of IIS for use with Dream Report Web Portal
TN 014: Manual Configuration of IIS for use with Dream Report Web Portal
Revised Nov 1, 2022
Introduction
Before installing Dream Report with the Web Portal option, Microsoft IIS (Internet Information Server) needs to be enabled, and configured with specific options, as described below. These tasks are required prior to Dream Report installation, and don't have to be performed again when creating/running a new project. If IIS is not enabled prior to Dream Report installation, the Dream Report Web Portal will not be installed.
Steps to follow:
1. Log in to Windows as a System Administrator.
2. Ensure that the computer on which you are installing Dream Report has Microsoft .Net Framework version 4.6 or later installed
3. Configure Internet Information Services, specific to the Windows operating system being used:
-
- Configuring IIS on Windows 7:
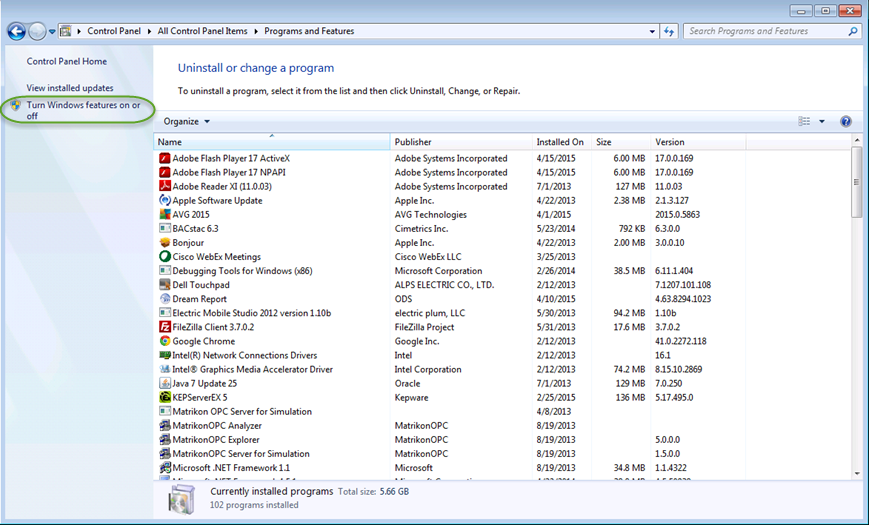
- Open the Programs and Features window from the Control Panel -> Programs and Features on your PC and click on Turn Windows features on or off, as shown below:
, 
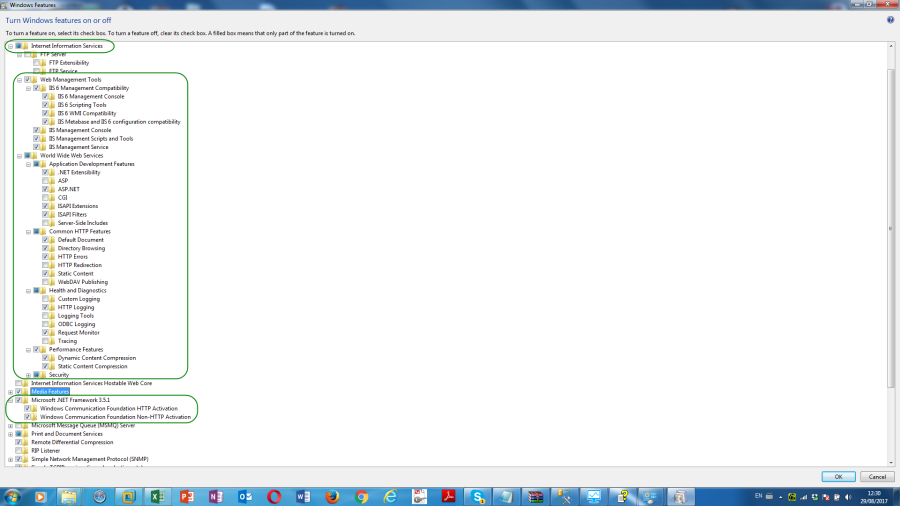 Expand the Internet Information Services section in the list of Windows features and make sure that all the following components are enabled (please see the checked items in the image below):
-
- Configuring IIS on Windows 8:
- Open the Windows Control Panel
- Open the Programs and Features window from the Control Panel -> Programs and Features on your PC and click the Turn Windows features on or off option, as shown below:
- Please make sure that the following components are enabled (the checked items in the following images):
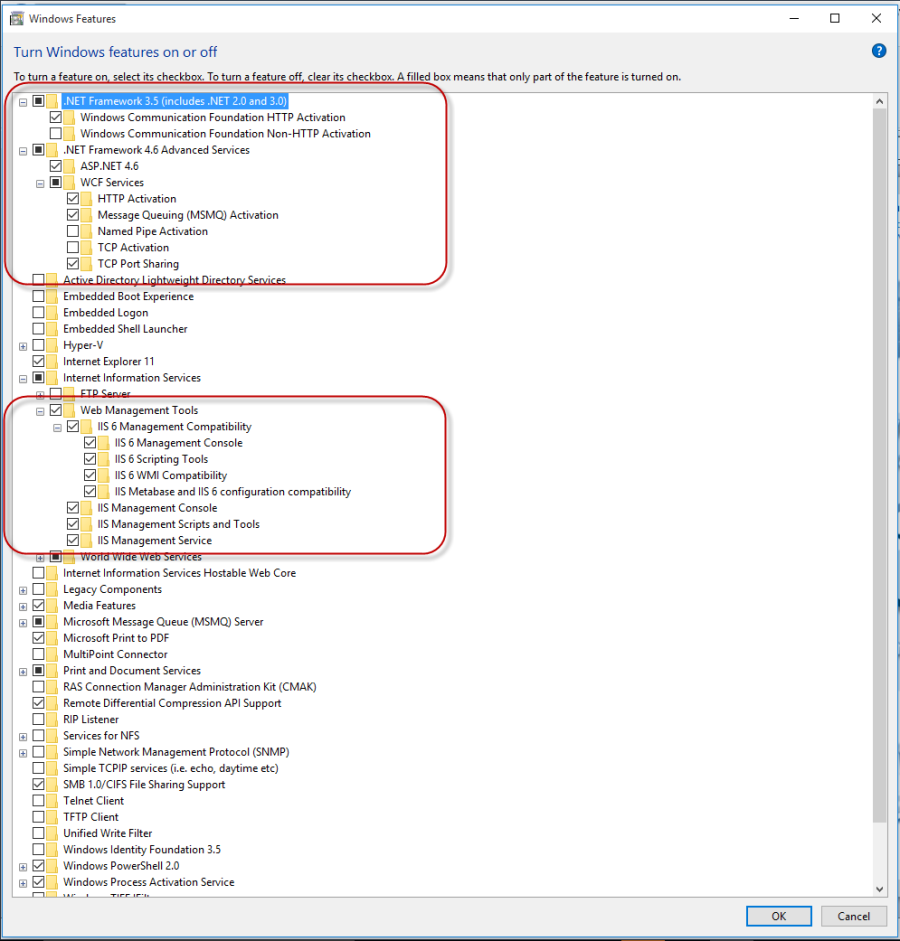
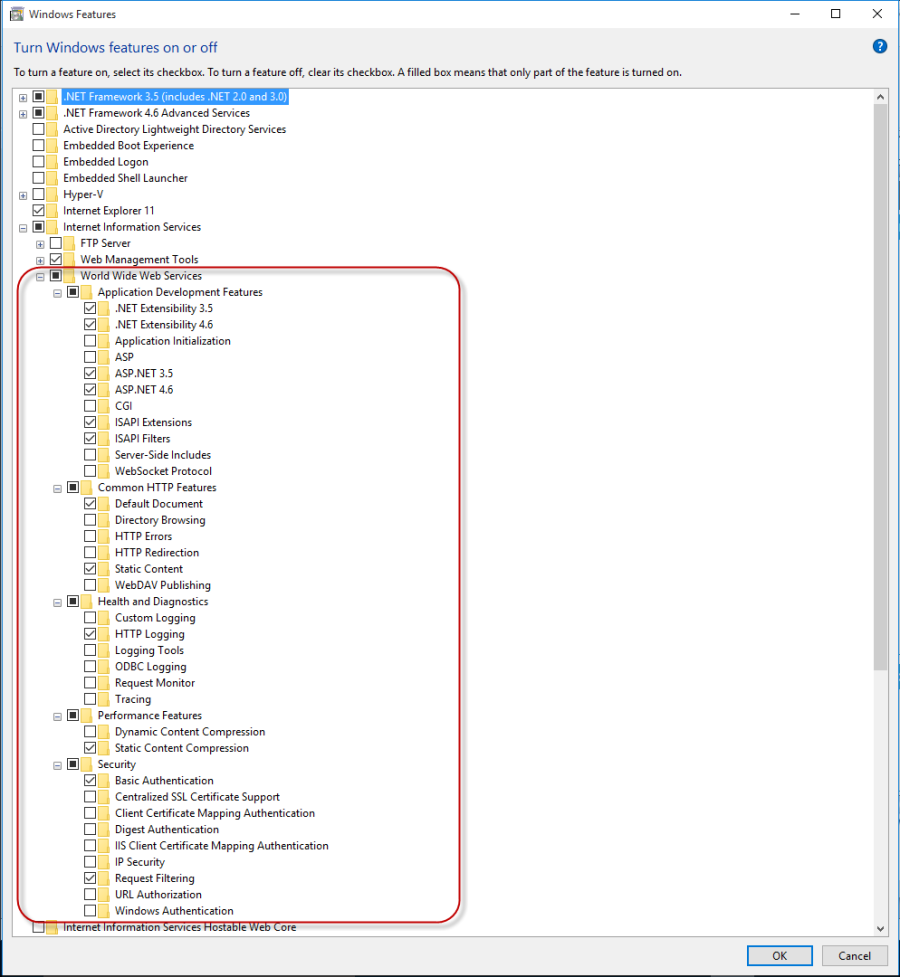
-
- Configuring IIS on Windows 10:
- Click on the Windows icon in the lower-left corner of the screen, and then click Settings.
- Click Search at the center of the window, and enter Turn Windows features on or off in the search box - select this option.
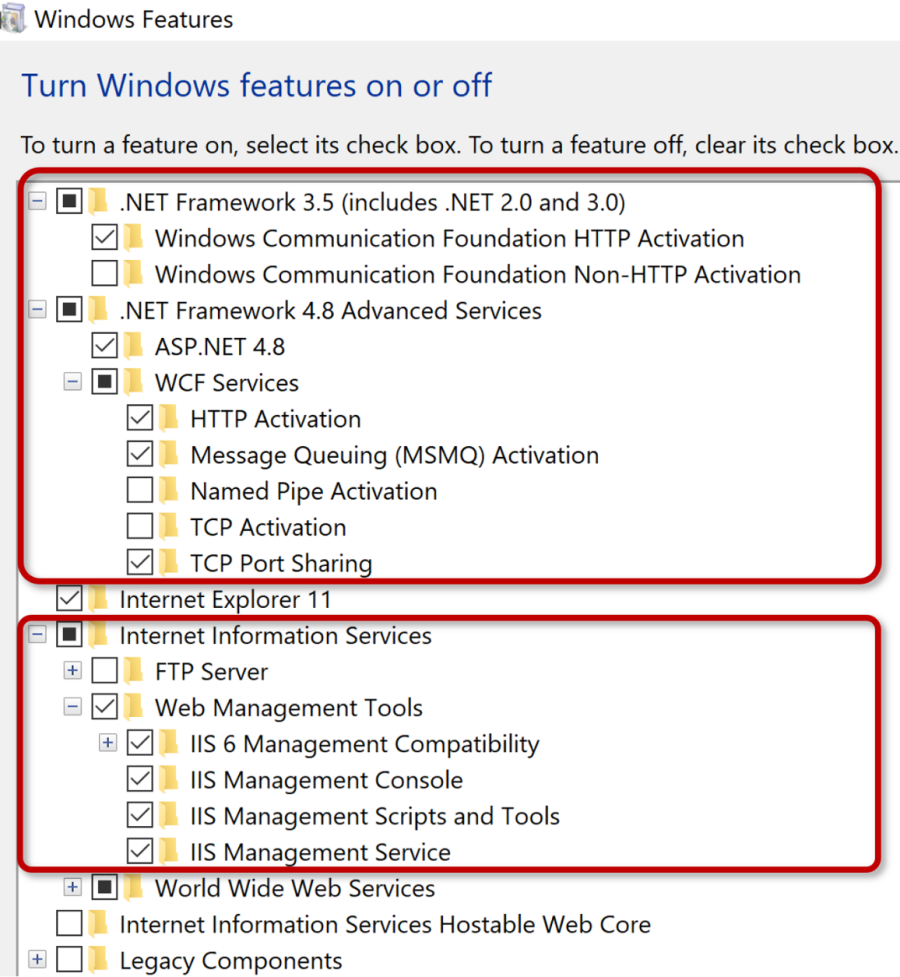 Make sure that the following components are enabled (the checked items in the images below):
Continued below…
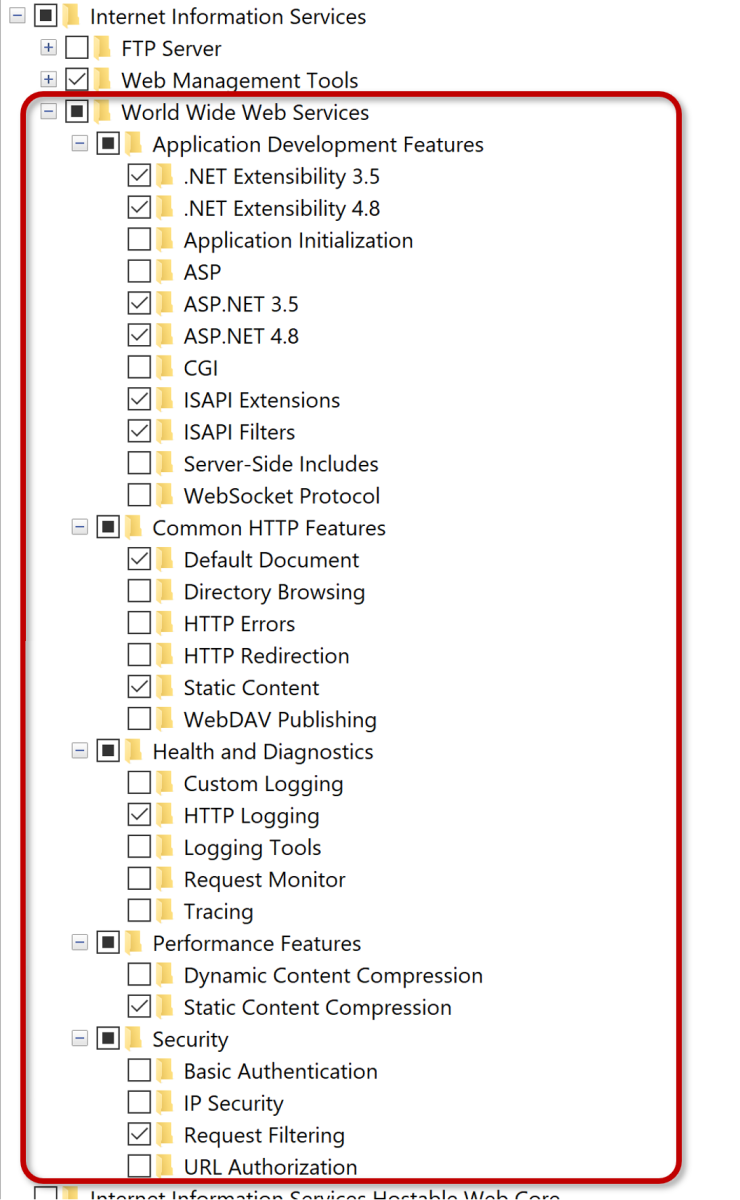
-
- Configuring IIS on Windows 11:
- Click on the Windows icon in the lower-left corner of the screen, and then click Settings.
- Click Search at the center of the window, and enter Turn Windows features on or off in the search box - select this option.
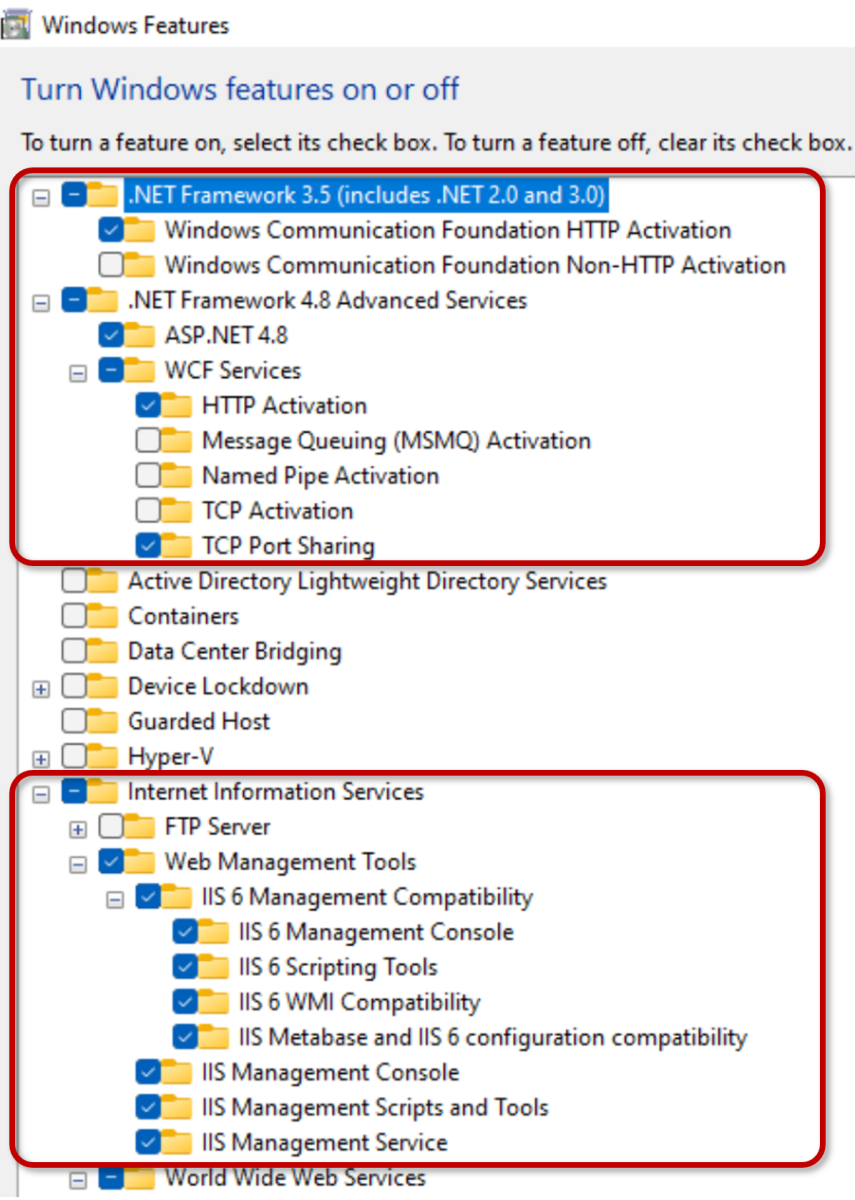 Make sure that the following components are enabled (the checked items in the images below):
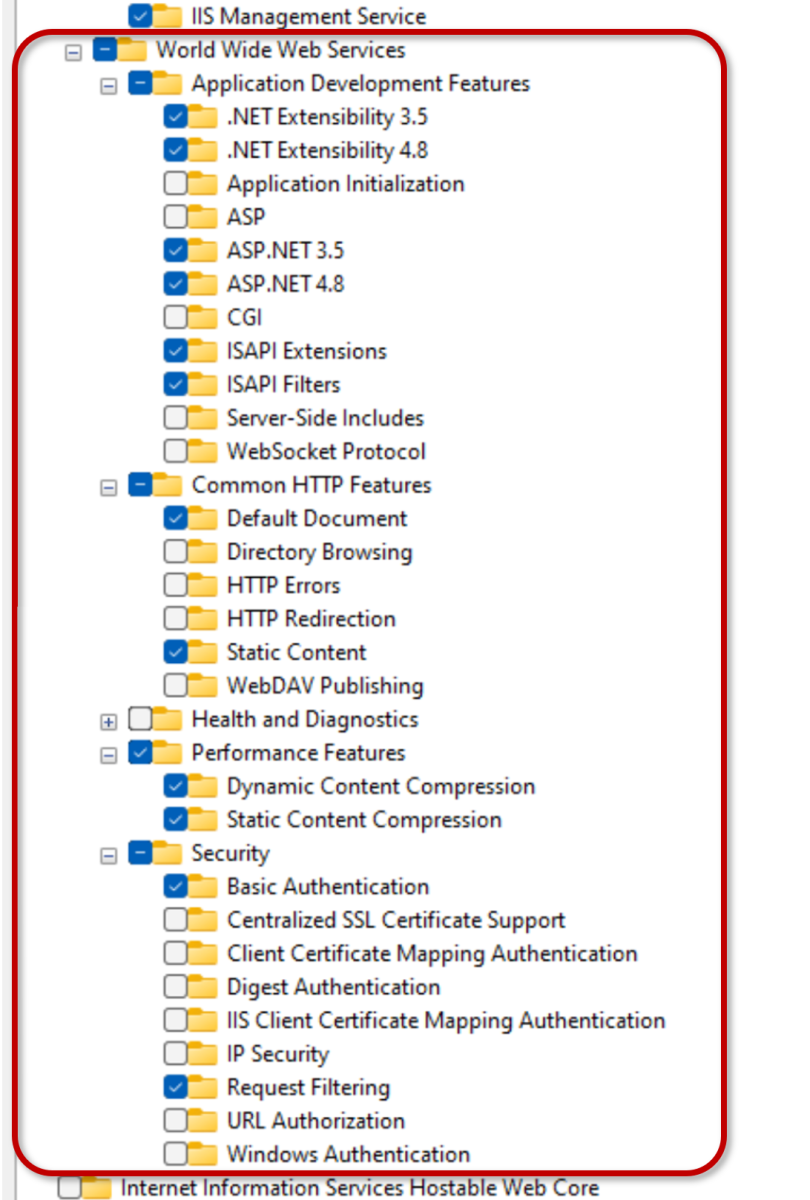 Continued below…
- Configuring IIS on Windows Server 2008:
- Click Start, then right-click on Computer, and in the context menu select Manage
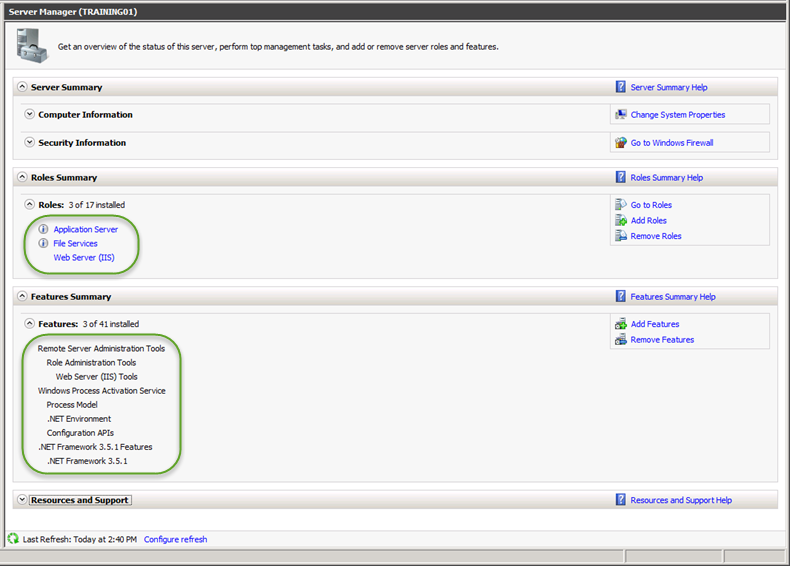
- Then, please go to the Roles section of the Server Manager, select the Web Server (IIS) role, and configure the Role Services as shown on the images below:
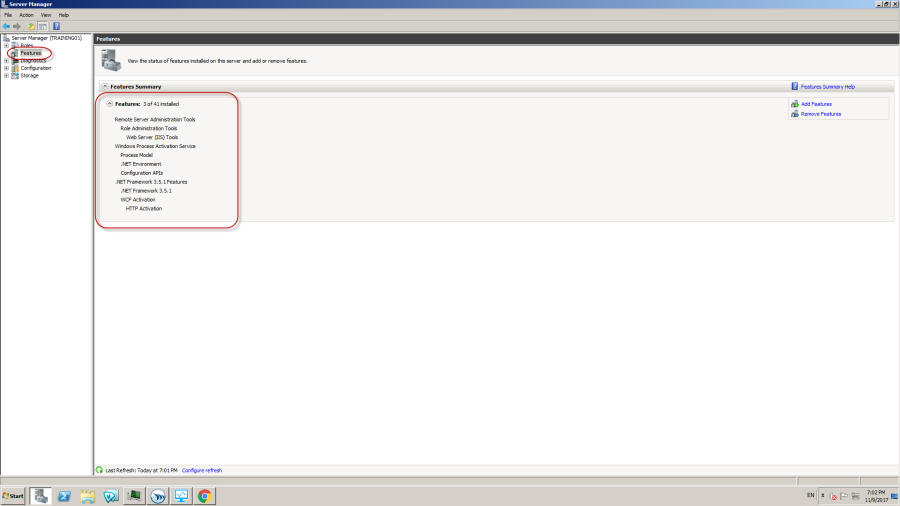
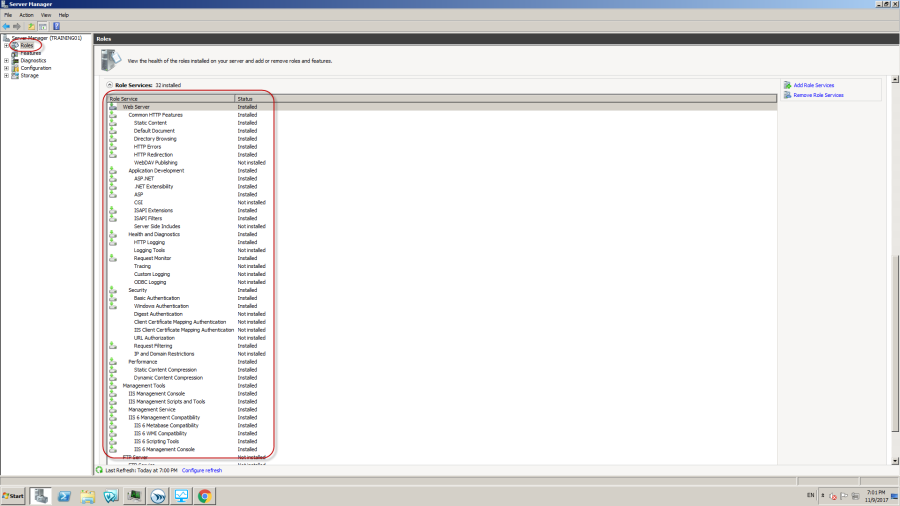
-
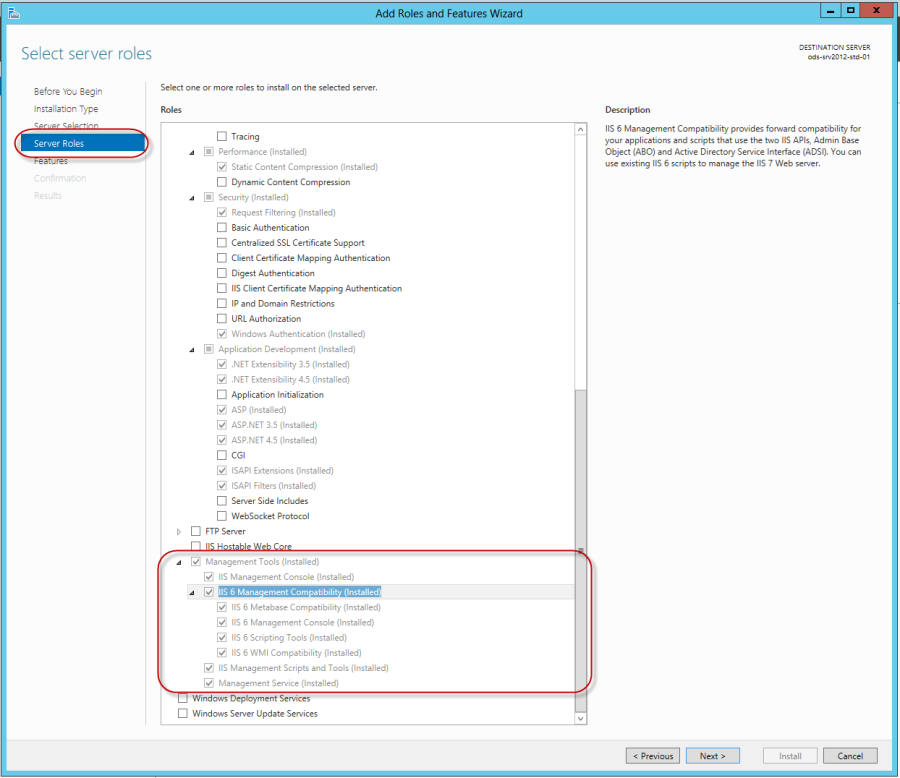
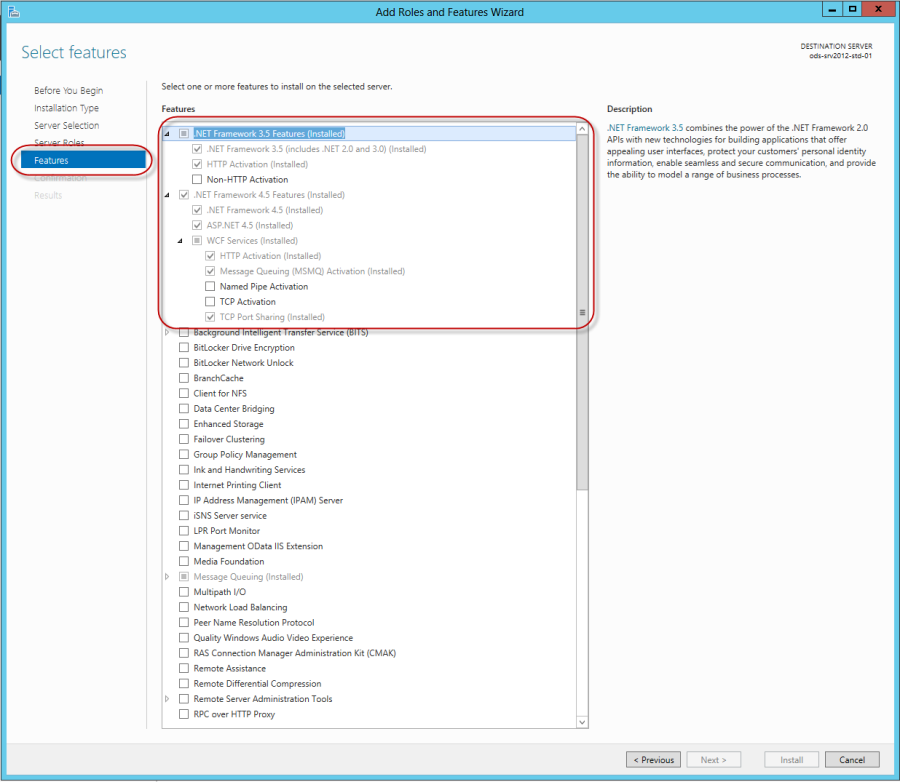
- Configuring IIS on Windows Server 2012:
- Click Server Manager from the Start menu and configure Server Roles as shown in the images below:
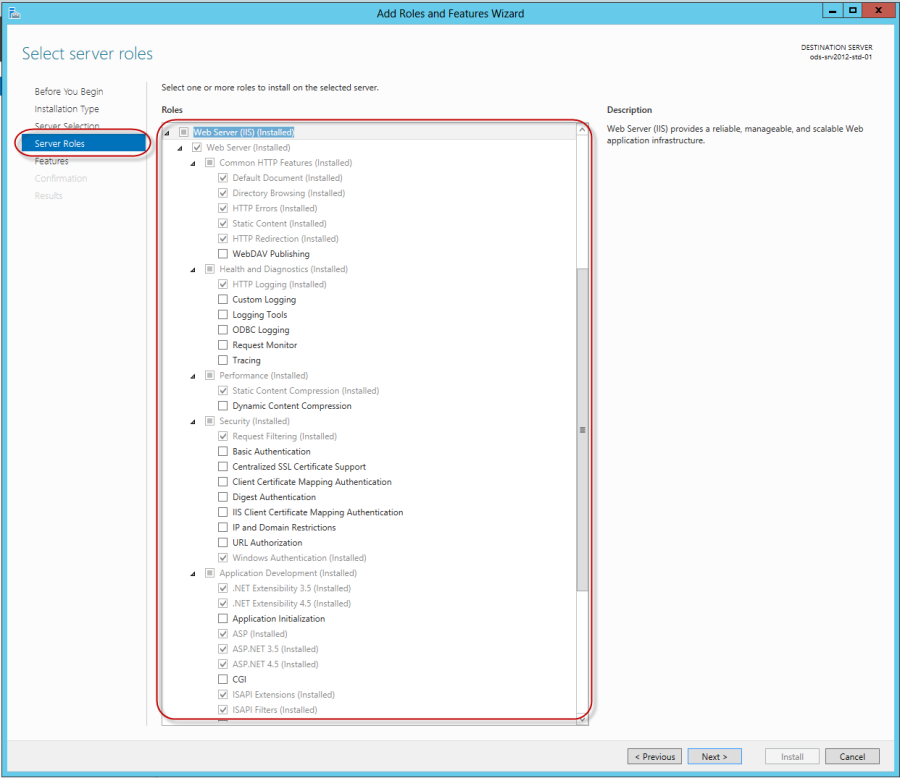
Server Roles configuration, continued…
- After configuring Server Roles, please go to the Features section and configure it as shown below:
-
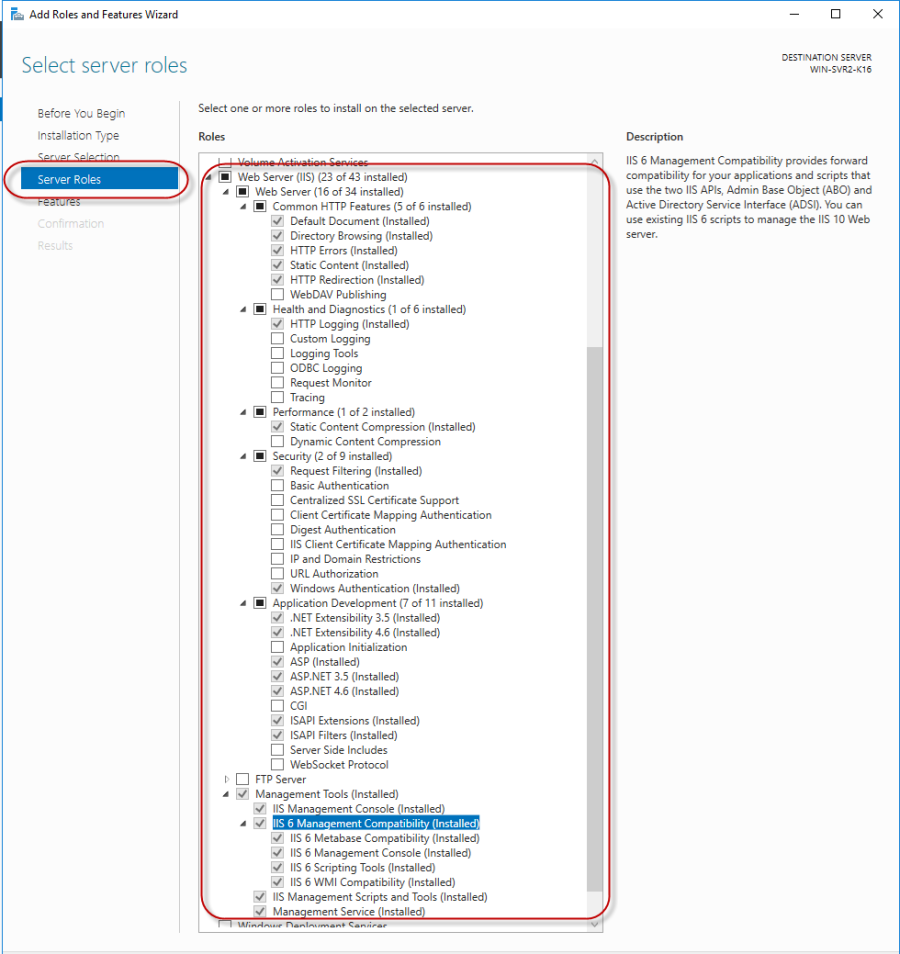
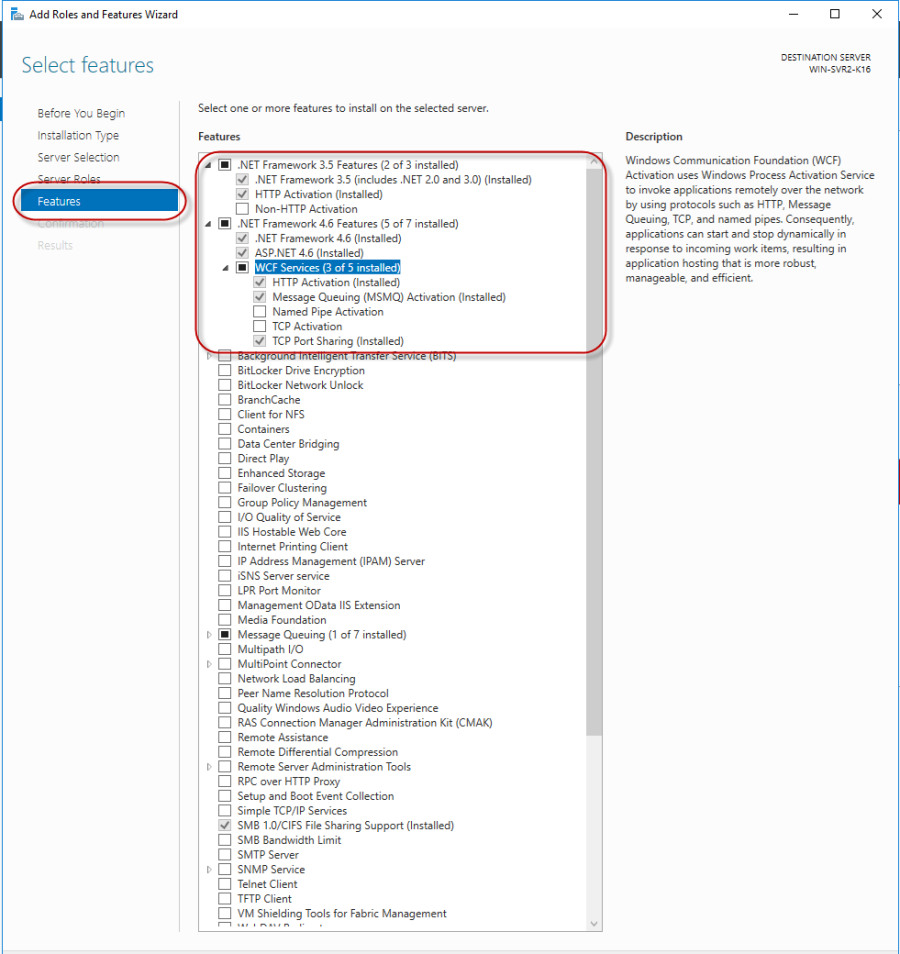
- Configuring the IIS on Windows Server 2016 and 2019:
- Click Server Manager from the Start menu and configure Server Roles as shown below:
- After configuring Server Roles, please go to the Features section and configure it as shown below:
-
- Configuring the IIS on Windows Server 2022:
- Click Server Manager from the Start menu and configure Server Roles as shown below:
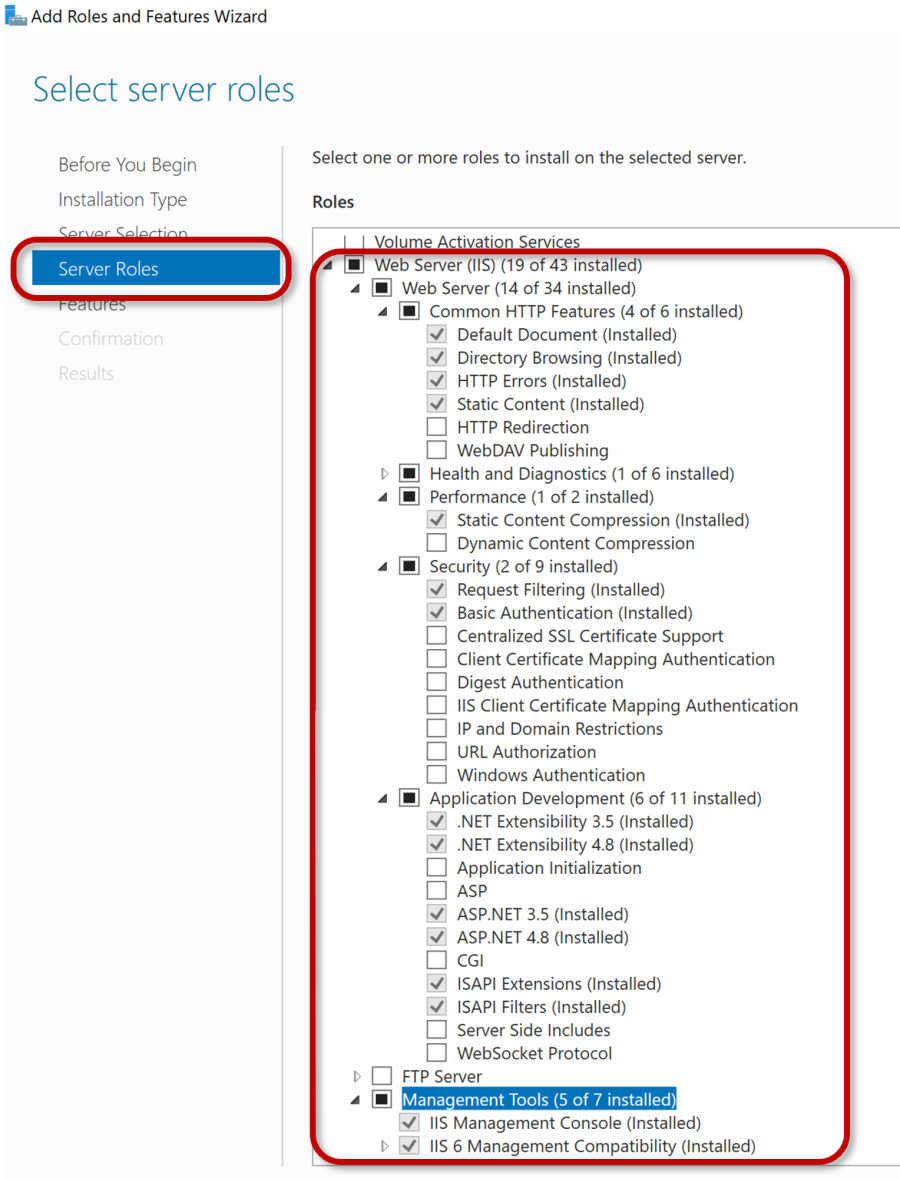
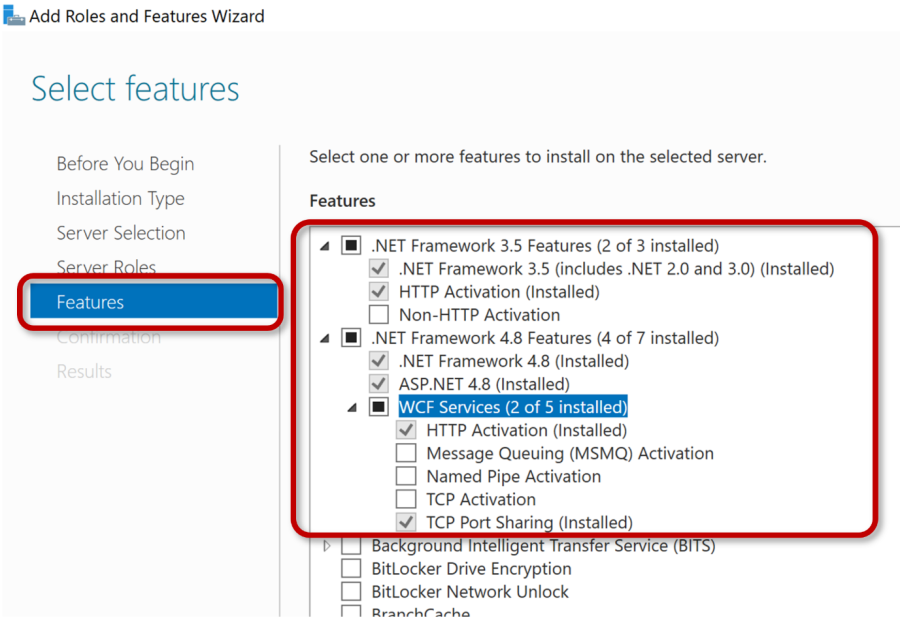
- After configuring Server Roles, please go to the Features section and configure it as shown below:
4. After installing/configuring IIS, you may be prompted to restart the computer.
5. Install Dream Report.
Notes:
- If IIS is not installed and configured correctly prior to installing Dream Report, Dream Report can still be installed, but you will receive a message stating that the DRWeb Portal will not be installed as part of the installation. IIS can be installed and configured later, at which point, you can run the Dream Report software installation again, where you will have the opportunity to modify the installation, and install the DRWeb Portal.
- Please note that for Dream Report 4.8 and later, HTTP Activation must be enabled, as shown in the various IIS configuration images above. HTTP Activation was not a requirement for the Dream Report web portal prior to version 4.8.